
Purpose
This customer-facing guide explains what a customer administrator must configure in their own Microsoft Entra tenant to enable SecureSafe OIDC sign-in and SCIM provisioning.
Important: No Customer App Registration Required
For the multitenant OIDC model, the customer does not create a separate App Registration, client secret, or redirect URI for OIDC. SecureSafe provides the multitenant application. The customer grants consent, which creates an Enterprise Application / Service Principal in the customer tenant.
What the Customer Configures
| Customer Entra area | Required? | What to configure |
| Enterprise Application / Service Principal | Yes | Created when the customer admin grants consent to the SecureSafe multitenant application |
| Admin consent | Yes | Grant tenant-wide consent for the requested OIDC permissions/scopes |
| User assignment | Yes | Assign users to the SecureSafe Enterprise Application |
| App role assignment | Yes, if roles are used | Assign PLAN_OWNER or PLAN_USER to each user |
| SCIM provisioning | Yes, if automated user lifecycle is used | Configure SecureSafe SCIM endpoint and bearer token |
| Conditional Access | Optional | Apply customer tenant policies to the SecureSafe Enterprise Application |
| Customer App Registration | No | Do not create a customer-owned OIDC App Registration |
| Customer client secret | No | No customer-side OIDC client secret is required |
| Customer redirect URL | No | Redirect URIs are configured on SecureSafe's multitenant App Registration |
Prerequisites
- An active Microsoft Entra tenant.
- Administrator permissions to grant consent and configure Enterprise Applications.
- SecureSafe SCIM endpoint URL, if SCIM provisioning is used.
- SecureSafe bearer token for SCIM provisioning, if SCIM provisioning is used.
- A SecureSafe plan/tenant enabled for Entra OIDC.
Step 1 – Grant Consent from Admin
- Open the SecureSafe admin-consent URL provided by SecureSafe. It follows the standard Entra admin-consent pattern, using the client ID of the SecureSafe multitenant application:
https://login.microsoftonline.com/<YOUR_TENANT_ID>/adminconsent?client_id=<SECURESAFE_CLIENT_ID> - Review the requested permissions.
- Grant consent for the organisation.
- Confirm that a SecureSafe Enterprise Application appears under Enterprise applications.
The Microsoft consent dialog lists the permissions requested by the SecureSafe application. To grant consent for the whole organisation, the administrator must tick Consent on behalf of your organization before accepting. With this option selected, no other users will be prompted to review the permissions:
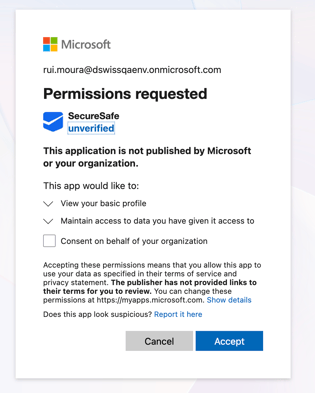
(Admin consent dialog with Consent on behalf of your organization selected: consent applies tenant-wide)
If the checkbox is left unticked, consent applies only to the signing-in user and other users will be prompted individually:
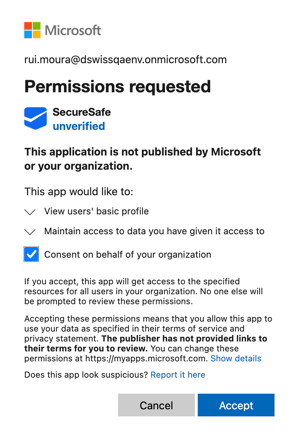
(Consent dialog without organisation-wide consent: applies to the signing-in user only)
Note: Until publisher verification is completed, the dialog may show the application as unverified and state that it is not published by Microsoft or your organisation. Confirm the application name is SecureSafe before accepting.
Go to SecureSafe Permissions and check that these permissions are set, otherwise click on “Grant admin consent” and accept with an admin account:
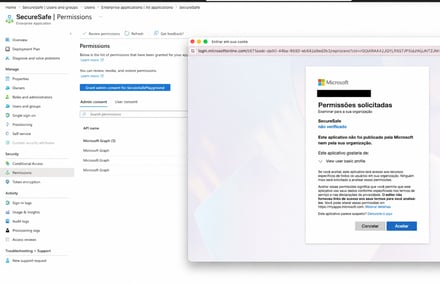 Step 2 – Assign Users and Roles
- Open Entra admin centre > Enterprise applications > SecureSafe.
- Under Manage > Properties, set Assignment required? to Yes. Without this setting, any user in the tenant can attempt to sign in to the application. SecureSafe accepts only provisioned users, so this acts as defence in depth rather than the primary access control.
- Assign the users who should access SecureSafe.
- If roles are available, assign exactly one SecureSafe role per user: PLAN_OWNER or PLAN_USER.
- Avoid assigning users without a role if SecureSafe expects role information at sign-in.
The PLAN_OWNER and PLAN_USER app roles are defined on the SecureSafe multitenant application. You do not create app roles in your own tenant; you only assign them to users.
Step 3 – Configure SCIM Provisioning
This configuration defines which user parameters Entra ID passes to SecureSafe. Entra ID will sync with SecureSafe every 40 minutes. SCIM provisioning is independent of the SSO protocol and is configured identically whether SAML or OIDC is used.
Configure Provisioning
For the provisioning we need to define the endpoints, tenant bearer token, and user attribute mapping.
- Click on Enterprise applications > SecureSafe.
.jpg?width=427&height=218&name=apps%20(1).jpg)
- Click on Manage > Provisioning > Get started.
- Two screens for the same thing can appear:
- 1)
.png?width=427&height=187&name=Screenshot%202025-09-19%20at%2012.12.00%20(1).png)
-
- 2)
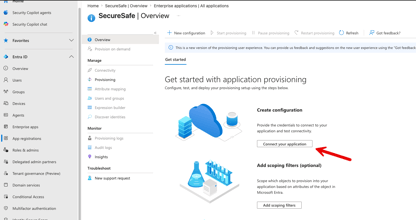
- Set Provisioning Mode to: Automatic
- Provide the SCIM settings:
- SCIM endpoint:
<SECURE_SAFE_SCIM_URL> - Secret Token:
<BEARER_TOKEN>
- SCIM endpoint:
- Test Connection. It should pass if the SCIM endpoints are reachable.
- Click Save.
- Refresh the page to see the applied changes.
.png?width=450&height=139&name=Screenshot%202025-09-19%20at%2012.22.55%20(1).png)
(SCIM settings saved after a successful connection test)
Provisioning Scope
SecureSafe does not support syncing groups. Group provisioning must be disabled in the created application.
- Click on Provisioning Microsoft Entra ID Groups
- Disable and Save (a page refresh may be needed to update the status).
.png?width=404&height=309&name=Screenshot%202025-09-19%20at%2014.15.18%20(1).png)
(Group provisioning disabled under Microsoft Entra ID Groups)
User Attribute Mapping
SecureSafe needs only a subset of the Entra ID user attributes. For some of these a specific mapping is required.
- Click on Provisioning Microsoft Entra ID Users
.png?width=422&height=323&name=Screenshot%202025-09-19%20at%2014.15.18%20(1).png)
(Attribute mapping under Provisioning > Microsoft Entra ID Users)
- Delete any other existing mapping so that only the attributes below are configured: userName, active, email, preferredLanguage, name.givenName, name.familyName, externalId, and userType.
.png?width=483&height=149&name=Screenshot%202025-09-12%20at%2016.04.32%20(1).png)
The specific mapping of a property can be defined by clicking Edit. It is recommended to save after each property mapping.
.png?width=464&height=264&name=Screenshot%202025-09-19%20at%2015.07.41%20(1).png)
Mapping userName
In SecureSafe, user names cannot be updated. The user name should therefore only be sent during creation.
- Click Edit userName
- Set this property to be sent Only during object creation
.png?width=493&height=100&name=Screenshot%202025-07-22%20at%2010.00.12%20(1).png)
- Click Ok.
Mapping Email
In SecureSafe, email is mandatory. You can use the default value defined on mail, or you can map to userPrincipalName if your users do not have a value populated in mail.
Mapping User Language
The user language is applied as the default for all users within the configured tenant. Since this value can be modified directly in the SecureSafe application, Entra ID does not need to send updates for it.
- Click Edit preferredLanguage and set the Mapping type to Constant; in the constant Value set one of the following values: EN, DE, FR or IT
.jpg?width=382&height=232&name=attribute%20(1).jpg)
(preferredLanguage mapped as a constant value)
- Set this property to be sent Only during object creation
.png?width=438&height=89&name=Screenshot%202025-07-22%20at%2010.00.12%20(1).png)
(Apply this mapping set to Only during object creation)
- Click Ok.
Mapping externalId
The external id should be sent only during creation, and the object id is used as the external id.
- Click Edit externalId
- Set this property to be sent Only during object creation
.png?width=534&height=126&name=Screenshot%202025-09-19%20at%2014.45.37%20(1).png)
(Apply this mapping set to Only during object creation)
- Click Ok.
Mapping userType
The user type carries the SecureSafe app role assigned in Entra: PLAN_OWNER or PLAN_USER. A user holds exactly one of these roles, not both.
- Click on Add new Mapping
.png?width=441&height=138&name=Screenshot%202025-09-19%20at%2014.59.09%20(1).png)
(Add new mapping under the attribute mapping list)
- Define mapping type as Expression and use the following expression:
SingleAppRoleAssignment([appRoleAssignments]) - Target with
userType(if this target does not exist it has to be created in Entra ID). - Click Ok.
.jpg?width=386&height=371&name=attribute2%20(1).jpg)
(userType mapped with the SingleAppRoleAssignment expression)
- Check that everything is correct and save.
.jpg?width=424&height=284&name=mapping%20(1).jpg)
(Final attribute mapping summary before saving)
Enable Provisioning
Once everything is configured, you can start provisioning. Entra ID will then manage SecureSafe users based on your tenant's data.
- Add Users and Groups to the application.
- Test provisioning on demand by selecting a valid user for the application and checking that provisioning works for a sample user.
.png?width=420&height=282&name=Screenshot%202025-09-29%20at%2017.11.28%20(1).png)
(Provision on demand for a sample user)
- Click on Provisioning > Overview > Start provisioning
.png?width=440&height=237&name=Screenshot%202025-09-19%20at%2017.02.21%20(1).png)
(Provisioning > Overview > Start provisioning)
.jpg?width=432&height=199&name=provisioning%20(1).jpg)
(Provisioning running with the initial sync in progress)
Step 4 – Configure OIDC SSO
For the multitenant OIDC model there is no customer-side OIDC configuration. Redirect URIs, client secrets, and API permissions are managed on SecureSafe's multitenant App Registration. OIDC sign-in is enabled once consent has been granted (Step 1), users have been assigned with roles (Step 2), and provisioning is running (Step 3).
In SecureSafe, only provisioned users are allowed to log in. OIDC authentication is therefore limited to accounts that have been synchronised and authorised in advance via SCIM, which keeps access tightly controlled.
IMPORTANT NOTE: SecureSafe must also authorise your tenant before sign-in will work. Send the SecureSafe team your Entra tenant ID (the tenant UUID) so this step can be completed.
Step 5 – Verify Sign-In
- Use a provisioned test user assigned to the SecureSafe Enterprise Application.
- Start sign-in from the SecureSafe SSO entry point.
- Authenticate with Entra ID.
- Confirm that the user returns to SecureSafe with a valid session and that their role inside SecureSafe matches their PLAN_OWNER or PLAN_USER assignment.
If sign-in fails, first confirm consent (Step 1), user and role assignment (Step 2), and provisioning (Step 3). Entra ID sign-in logs (Monitoring > Sign-in logs on the tenant) record the failure reason in the AADSTS error code, which is the fastest way to localise the problem. Issues on the SecureSafe multitenant application itself, such as redirect URI or client secret problems, must be raised with the SecureSafe team.