
Introduction
This guide describes how to integrate SecureSafe Exchange in Microsoft Entra ID (formerly Azure AD) using SCIM Provisioning and SAML SSO.
-
SCIM Provisioning enables user management for SecureSafe Exchange directly within Entra ID. Supported user types include administrators and advisors.
-
SAML SSO allows users to sign in to SecureSafe Exchange with their Entra ID credentials.
You’ll have to create and configure SecureSafe Exchange as a new Enterprise application. To do so you will need to login to EntraID configuration page and you will need to receive some data from the SecureSafe Exchange team.
The purpose of this guide is to ensure a consistent setup process, reduce manual configuration errors, and clarify the specific terminology used in the context of SecureSafe Exchange.
SecureSafe Exchange Glossary
|
Term |
Description |
|---|---|
|
Exchange |
A shared secure vault to exchange documents (typically in the context of a business process). |
|
Advisor |
An advisor can create exchanges and invite clients to exchanges. An advisor can login to SecureSafe Exchange via Entra ID (SAML SSO). |
|
Admin |
An admin can (re)assign advisors as deputies to exchanges. An admin can login to SecureSafe Exchange via Entra ID (SAML SSO). An admin needs to be promoted by a tenant before the admin can manage exchanges. |
|
Tenant |
A tenant is a kind of super user. Admins, advisors, and exchanges always belong to a tenant. A tenant can only login using username and password. |
Pre-requisites
Before starting the configuration, make sure you have the following:
-
An active Microsoft Entra ID tenant with administrative permissions.
-
Access to the Azure Portal.
-
SecureSafe Exchange requires the following Entra ID properties for its users: givenName, familyName, email and phoneNumber
-
You have received the following from SecureSafe Exchange team:
-
<SECURE_EXCHANGE_SCIM_URL>- URL to the SCIM endpoints of SecureSafe Exchange -
<SECURE_EXCHANGE_SAML_URL>- URL for SAML login to SecureSafe Exchange -
<BEARER_TOKEN>- used to authenticate EntraID calls in SecureSafe Exchange -
<TENANT_ID>- tenant id to setup login
-
Application Creation
A new Enterprise application needs to be created in order to integrate SecureSafe Exchange.
-
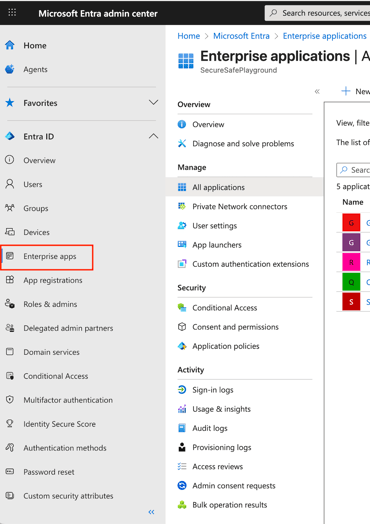
Click on Entra ID > Enterprise applications and New Application
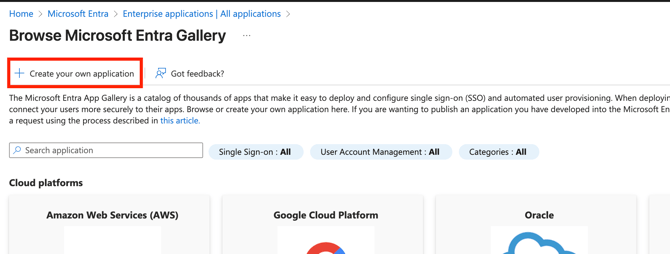
- Click "Create your own application"
-
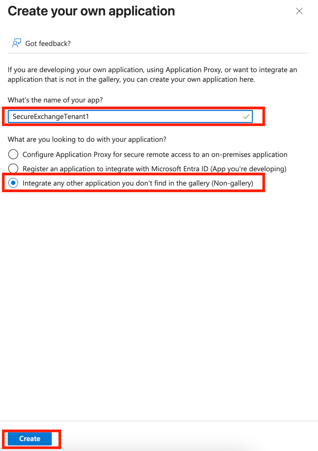
Assign a name to the application. The name needs to be unique on your EntraId. In a multi-tenant SecureSafe Exchange it might make sense to append a tenant-specific identifier, e.g.
SecureExchange_Tenant1 -
Choose "Integrate any other application you don’t find in the gallery (Non-gallery)" click Create
Configure SCIM Provisioning
This configuration is needed in order to define which parameters of the users will be passed by Entra ID to SecureSafe Exchange. Entra ID will sync with SecureExchange every 40 minutes.
Create User Roles
SecureSafe Exchange support stwo roles: admin (ADMIN) and advisor (ADVISOR)
-
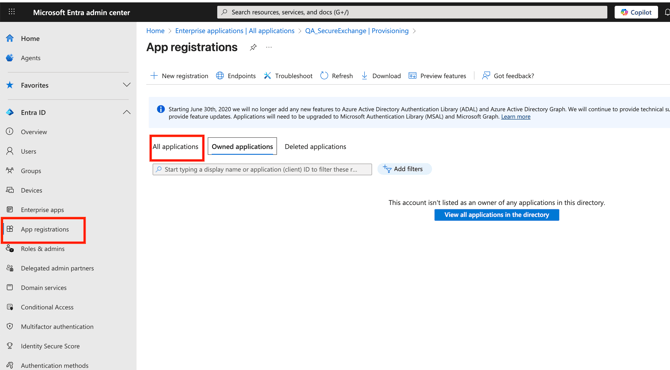
Click on App registrations > All applications
-
Select SecureSafe Exchange application
-
Select Manage > App roles
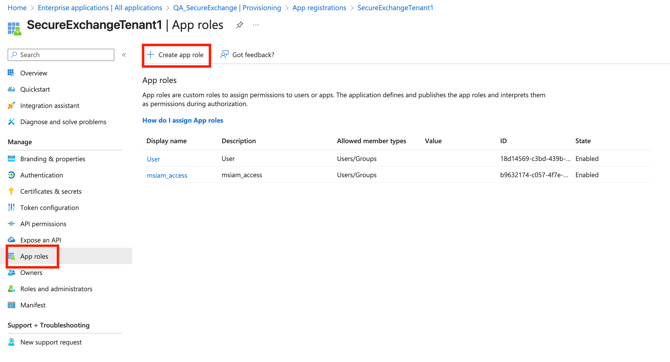
-
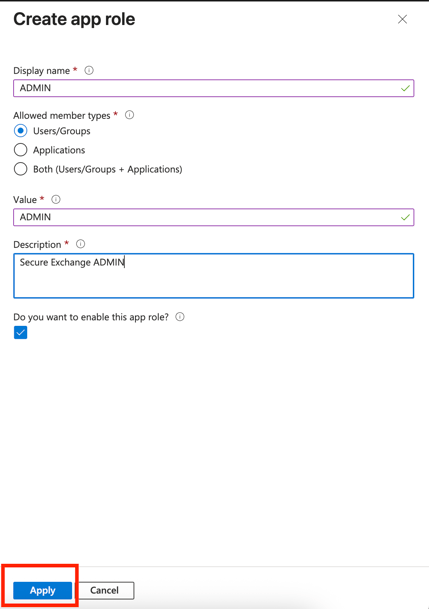
Create app role for the admin
-
Use ADMIN for display name and value, and add some meaningful description
-
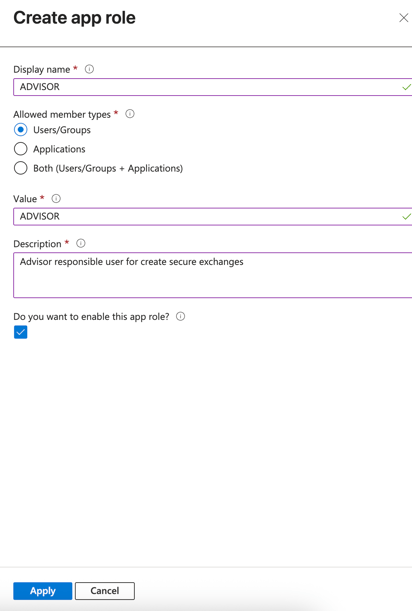
Create app role for the advisor
-
Use ADVISOR for display name and value, and add some meaningful description
-
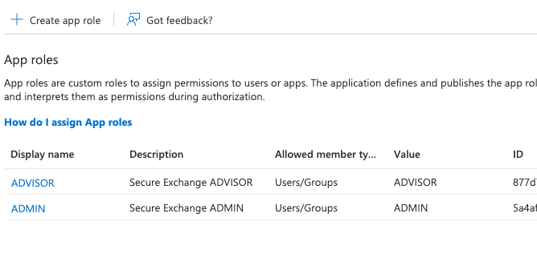
Delete all other existing roles to avoid wrong assignments
Configure Provisioning
For the provisioning we need to define the endpoints, tenant bearer token, and user attribute mapping.
-
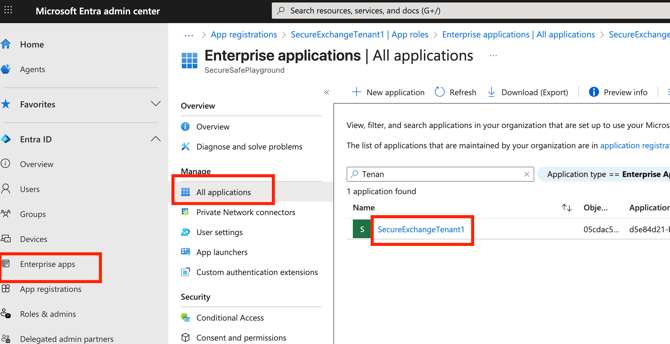
Click on Enterprise Aplications><ApplicationName>
-
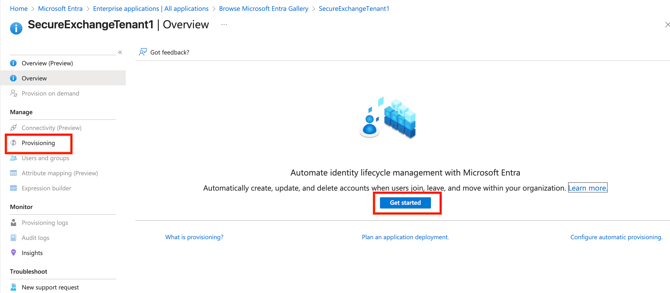
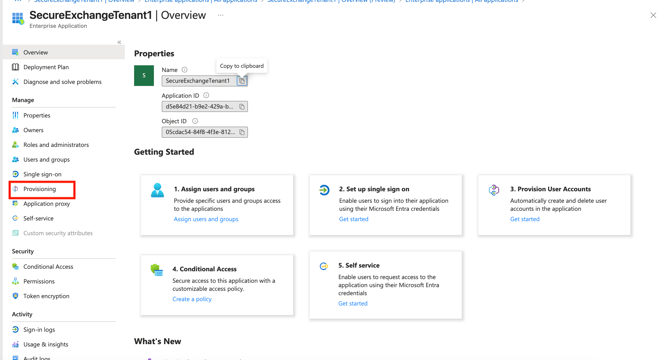
Click on Manage -> Provisioning → Get started
-
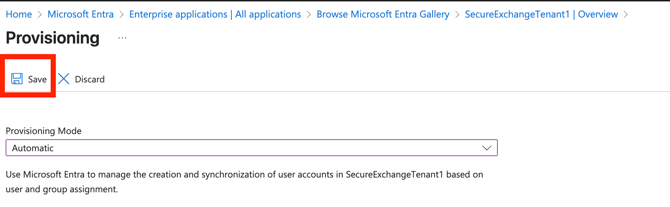
Set Provisioning Mode to:
Automatic -
Provide the SCIM settings:
-
SCIM endpoint:
<SECURE_EXCHANGE_SCIM_URL> -
Secret Token:
<BEARER_TOKEN>
-
-
Test Connection → it should pass if SCIM endpoints are live
-
Click Save
-
Refresh page to see the applied changes
Provisioning Scope
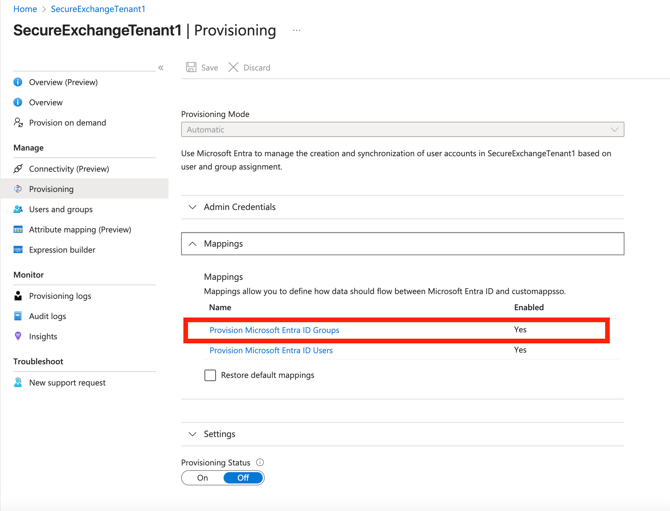
SecureSafe Exchange doesn’t support syncing groups. This must be disabled in the created application
-
Click on Provisioning Microsoft Entra ID Groups
-
Disable and Save (maybe refresh page will be needed to update the status)
User Attribute Mapping
SecureSafe Exchange needs only an subset of the Entra ID user attributes. For some of these attributes a specific mapping is required.
-
Click on Provisioning Microsoft Entra ID Users
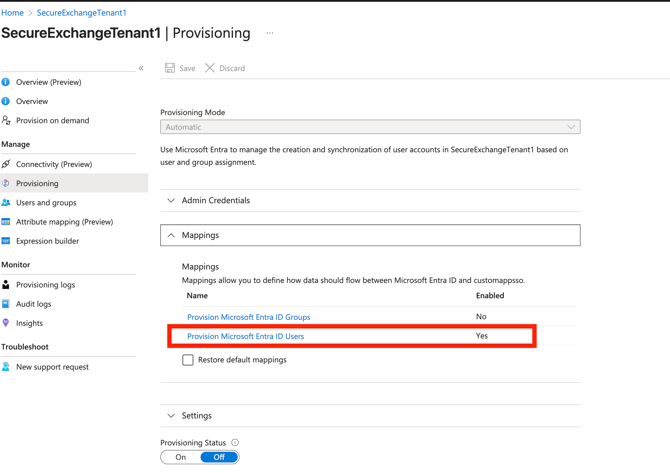
-
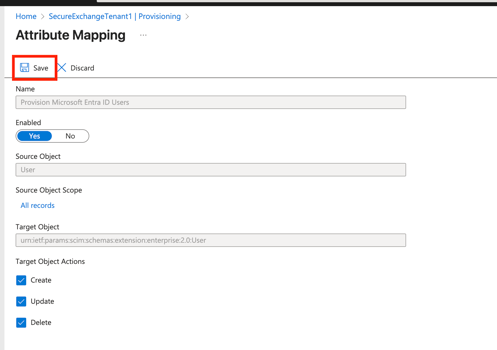
Delete any other existing mapping such that only the parameters below are configured.
-
username ( Specific Mapping described bellow)
-
active
-
email ( Specific Mapping described bellow)
-
preferredLanguage ( Specific Mapping described bellow)
-
name.givenName
-
name.familyName
-
phoneNumbers[type eq "mobile"].value
-
externalId ( Specific Mapping described bellow)
-
userType ( New Custom AttSpecific Mapping described bellow)
-
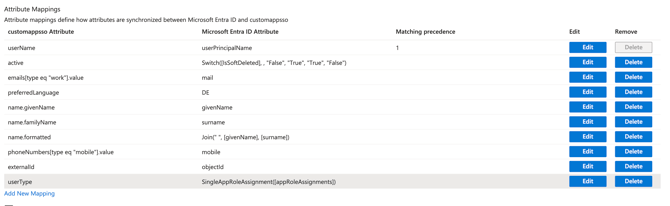
The specific mapping of a property can be defined by clicking on “Edit”. It is recommended to save after each property mapping.
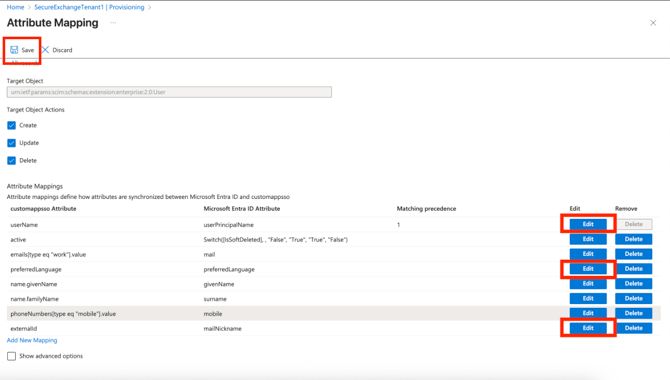
Mapping userName
In SecureSafe Exchange user names cannot be updated. Hence, the user name should only be sent during creation.
-
Click Edit userName
-
Set this property to be sent Only during object creation
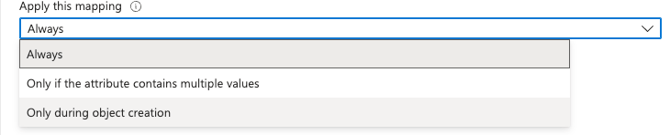
- Ok
Mapping Email
In SecureSafe Exchange email is mandatory, you can use the default value defined on mail or you can map to use userPrincipalName in case of your users doesn’t have this information on mail.
Mapping User Language
The user language will be applied as the default for all users within the configured tenant. Since this value can be modified directly in the SecureSafe Exchange application, Entra ID does not need to send updates for it.
-
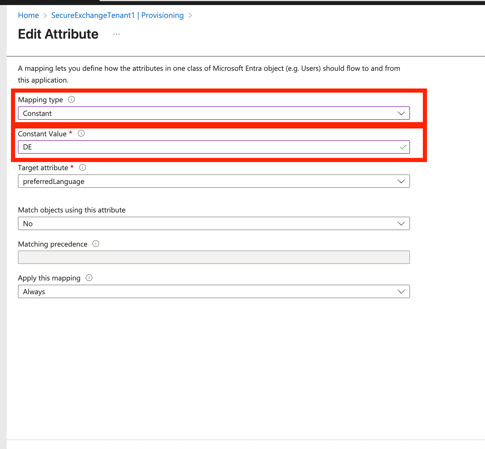
Click Edit preferredLanguage and set with a Mapping type Constant and in the constant Value set one of the following values: EN or DE or FR or IT
-
Set this property to be sent Only during object creation
- Ok
Mapping externalId
The external id should be sent only during the creation and the object id shall be used as external id.
-
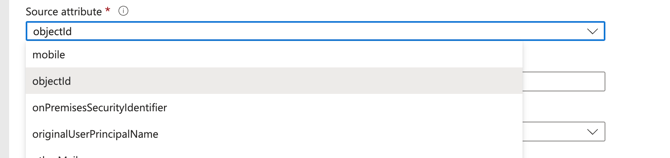
Click Edit externalId
-
Set this property to be sent only on creation
-
Set the source with objectId
-
Click on OK
Mapping userType
The user type defines whether the user is an admin or an advisor. A user can only be an admin or an advisor, but not both.
-
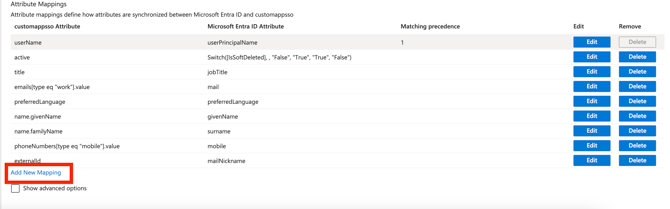
Click on Add new Mapping
-
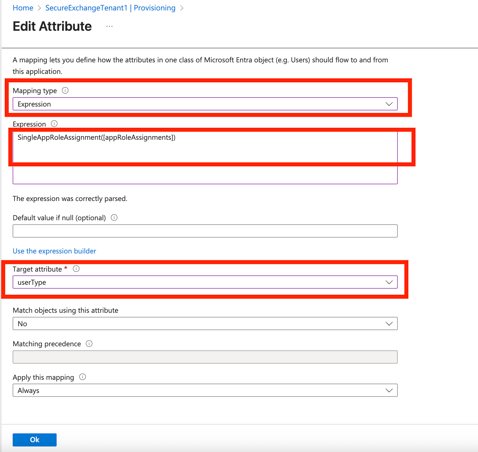
Define mapping type to expression and use the following expression :
SingleAppRoleAssignment([appRoleAssignments]) -
Target with userType (if this target doesn’t exist it has to be created in EntraId)
-
Click on OK
-
Check if everything is fine and save
Enable Provisioning
Once everything is configured, you can start provisioning. Entra ID will then manage the SecureSafe Exchange users based on your tenant’s data.
-
Add Users/ Groups to the application
-
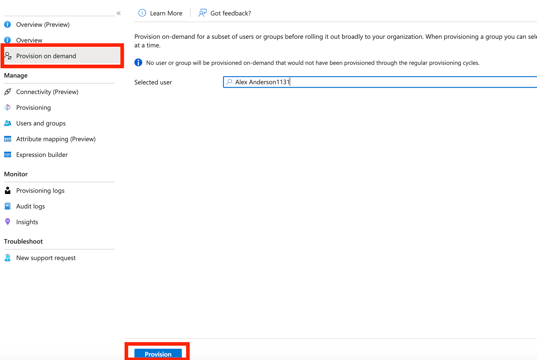
Test provisioning on Demand selecting a valid user for the application and check if the provisioning is working for a sample user.
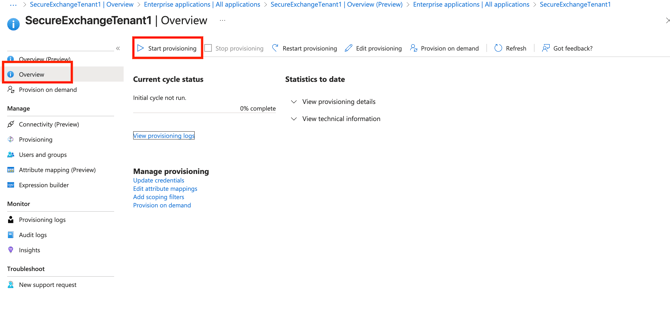
- Click on Provisioning > Overview > Start provisioning
Configure SAML SSO
This section describes how to configure SAML SSO for SecureSafe Exchange. The setup involves defining the SAML endpoints, exchanging metadata, and mapping the required attributes and claims. After configuration, users can sign in to SecureSafe Exchange with their Entra ID credentials, subject to the access policies already enforced in Entra ID.
In SecureSafe Exchange, only provisioned users are allowed to log in. This means SAML SSO authentication is limited to accounts that have been synchronized and authorized in advance, providing tighter access control.
-
Click on Single sign-on and SAML
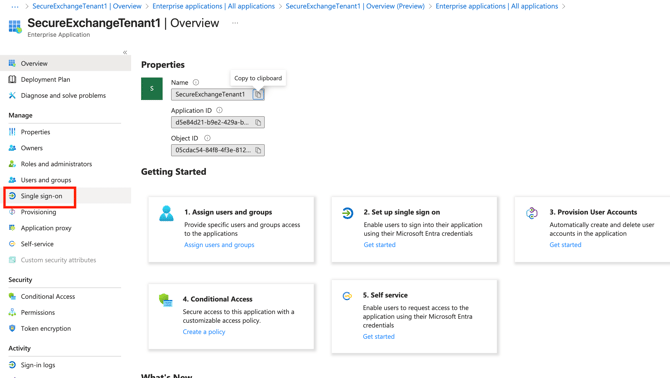
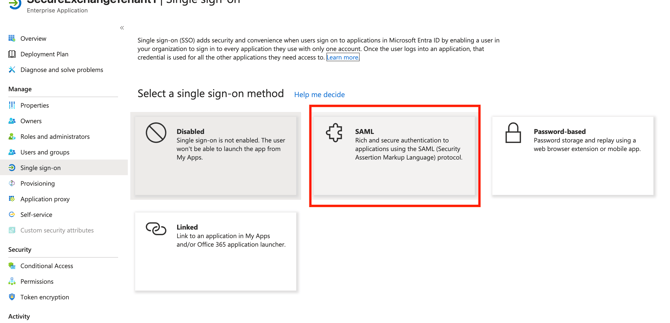
-
Click on Basic SAML Configuration Edit
-
Add Identifier→
<TENANT_ID> -
Add Reply URL
<SECURE_EXCHANGE_SAML_URL> -
Press “Save”
-
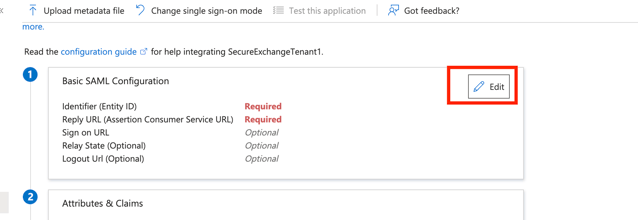
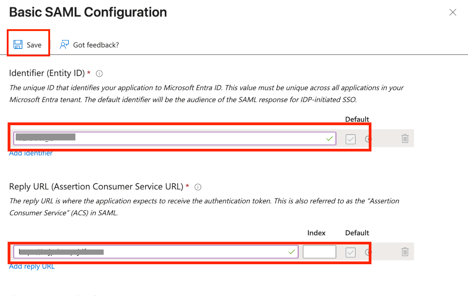
-
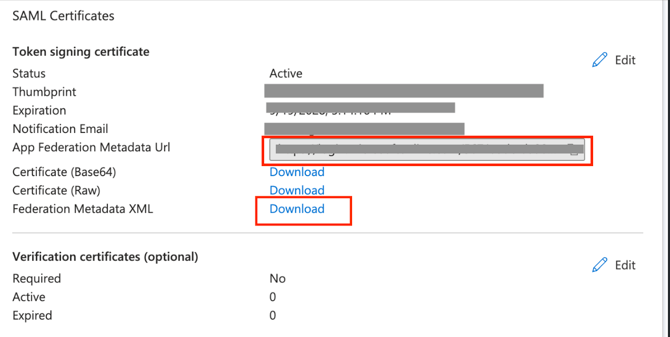
Download the Federation Metadata XML and copy the App Federation Metadata URL
-
Share the following attributes with the SecureSafe Exchange team to enable SAML login on your instance:
-
App Federation Metadata URL
-
Federation Metadata XML
-