What Is Data Inheritance?
In our digital age, data inheritance is vital. As we store more of our personal information online and use social media, emails, blogs and other cloud solutions on a daily basis, we are building up a complex digital legacy through our use of various digital services over the years. This makes it crucial to plan for how it will be passed on securely to our heirs or chosen beneficiaries. For this reason, SecureSafe offers a special feature, which helps loved ones put the digital ghost of a deceased family member to rest: data inheritance.
Data inheritance helps loved ones, who have lost a family member or a person close to them to manage important digital documents and login data, which belonged to the deceased. This way, the loved ones can gain access the digital legacy of the deceased to perform needed actions, such as:
-
Delete or deactivate profiles of the departed from social media or other accounts.
-
Use the saved passwords to access financial data, such as banking accounts, or share accounts.
-
Access important documents such as contracts, share certificates, or guarantees.
For more information about Data Inheritance, refer to our article on the topic.
How to Activate Data Inheritance in Your SecureSafe
To activate the Data Inheritance feature for your SecureSafe account, perform the following steps:
- On the menu bar at the top of the SecureSafe web application, click the dropdown icon beside your account user name.
- From the drop-down menu displayed, click Settings to display the SecureSafe settings window.
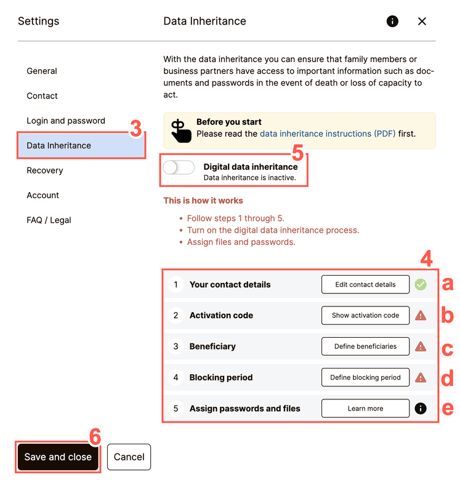
- From the tabs displayed on the left of the Settings window, select Data Inheritance. Under that tab, you will find a list of prerequisites that must be in place before the data inheritance feature in SecureSafe can be activated. These prerequisites will be described in further detail in the following steps. Once each of the prerequisites has been completed, a check mark appears beside the listed item.
- The list of prerequisites that must be executed before activating the data inheritance feature in SecureSafe consists of five items.
- If you have not yet set up Your contact details, or would like to make some adjustments, click Edit contact details. You will find further information on this in our article on Contact Settings.
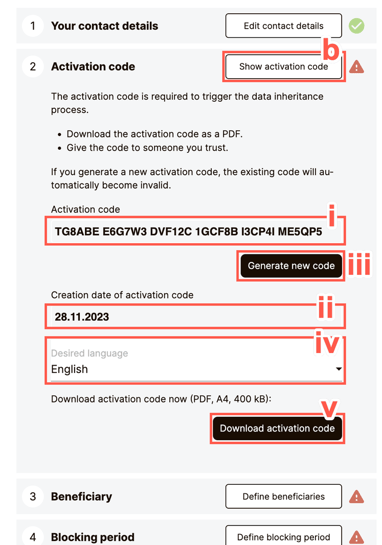
- For Activation code, click Show activation code to expand the section.
-
View your current activation code here. Remember that this activation code is part of the data inheritance process and is not to be confused with a account recovery code.
-
View the date that your current activation code was created.
-
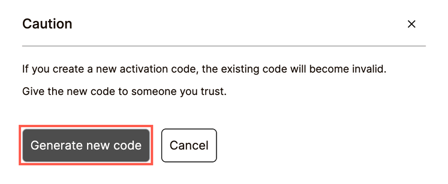
Optionally, click Generate new code to invalidate your current activation code and generate a new activation code. When prompted to confirm that you wish to proceed, click Generate new code. Please note: If your original code was already given to people, these codes will no longer work.
- Set the preferred language for the PDF file your activation code will be downloaded as.
- Click Download activation code to download a PDF file containing of your activation code.
- Locate the downloaded PDF in your operating system's Downloads folder. It is advisable to carefully read the PDF file’s contents. Once this is done, a check appears beside the item.
-
- In order to add or adjust the information on the Beneficiary of your digital inheritance, click Define beneficiaries to expand the section.
- View your list of existing beneficiaries. If you have not added any yet, this list will be empty. To delete an existing beneficiary, click the
 symbol beside the beneficiary that you wish to delete. To edit an existing beneficiary, click the
  symbol beside the beneficiary that you wish to edit. Then make the required changes to the Email address field and click OK.
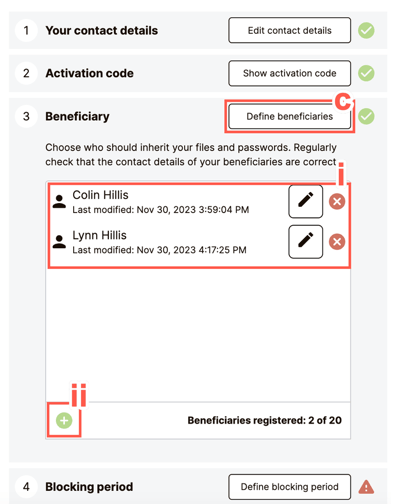
- To add a beneficiary, click the
 symbol, which displays the Add beneficiary window. You can add multiple beneficiaries.
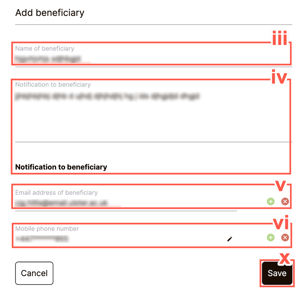
-
Add the name of your new beneficiary in the Name of beneficiary field.
-
Add a bespoke note for your new beneficiary in the Notification to beneficiary field.
-
Type an email address for your new beneficiary in the Email address of beneficiary field. To delete an existing email address, click the
 symbol beside the email address that you wish to delete. To add another email address for the same beneficiary, click the symbol and populate the text field provided.
 - To add your beneficiary's mobile phone number, click the symbol beside the Mobile phone number field. The Edit mobile phone number window displays. To delete an existing mobile phone number, click the symbol beside the number that you wish to delete. To add another mobile phone number for the same beneficiary, click the symbol and populate the fields provided.
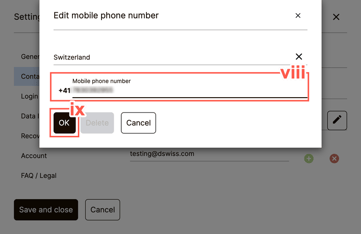
- By default, the location dropdown is expanded. Select the country where the mobile phone is registered to. The list of countries filters as you type, as displayed in the screenshot.

-
Now type your beneficiary’s mobile/cell number into the Mobile phone number field.
-
Click OK to save the changes made to your beneficiary’s mobile phone number.
-
Click Save to the details of your new beneficiary.
- View your list of existing beneficiaries. If you have not added any yet, this list will be empty. To delete an existing beneficiary, click the
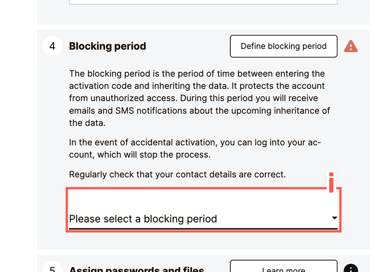
- To select a suitable blocking period, click Define blocking period to expand the section. The blocking period is the period of time that passes between a beneficiary using the activation code and your data being transferred to them. During this blocking period, you as an account owner can stop the inheritance process by logging into the SecureSafe account. We therefore recommend you choose a blocking period that gives you enough time to stop an inheritance process that has already been triggered, for example, if the inheritance process it was triggered accidentally.
- Click the dropdown Please select a blocking period.
-
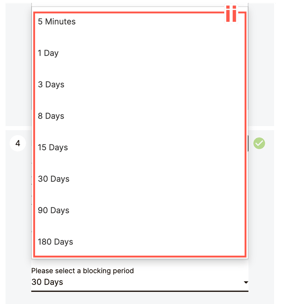
From the list of possible blocking periods displayed, select a suitable blocking period. Once this is done, a check appears beside the item.
- Click the dropdown Please select a blocking period.
- For the Assign passwords and files prerequisite, click Learn more to understand how to assign your files and passwords to your chosen beneficiaries. For more information on this topic, please refer to the article on Data Inheritance.
- Switch the Digital data inheritance toggle switch from inactive to active.
- Click Save and close.